Go to comments
Data View Web Part
- Need SharePoint Designer to configure it
- Displays data/Items with in sub site
- Displays data ( items) from only one List/Library
- Binds to List/Library GUID
- XSLT Style Templates store on Web Part itself
- Available on all template
Content Query Web Part
- Can be configurable from Browser
- Displays data/Items from Site Collection Level
- Displays data (items) based on Content Type
- Binds to Content Type
- XSLT Style templates stores on ItemsStyle.xsl
- Available on Publishing Portal template
SharePoint 2010's Content Query Web Part
The Content Query Web Part is one of three Web Parts provided by SharePoint 2010's publishing sites to display content. The Content Query Web Part allows you to display content from anywhere in your site collection; it’s useful for rolling up content to a home page or creating an archive view of content.
The Content Query Web Part is commonly used to display a list of news articles on a site’s landing page (the first page visitors usually arrive at). Say you have three people creating new articles in your site. You can use the Content Query Web Part to automatically display a list of these articles on your department’s landing page.
Follow these steps to use the Content Query Web Part:
- Insert the Content Query Web Part into your page and edit the Web Part’s properties.The Content Query Web Part is located in the Content Rollup section.
- In the Query section of the Web Part, select the options that will return the items you wish to see in the Web Part.
 The Query section provides many options, including:
- Source: Select the location in your site hierarchy where you want to query items. If you want to display items regardless of where they appear in your site hierarchy, select the Show Items from All Sites in This Site Collection radio button and select the List Type, Content Type Group, and Content Type you want to display.For example, if you want to roll up all project tasks, use your Tasks List Type and List Content Type Group and Task Content Type.
- List Type: Select the kind of list that stores your items from the drop-down list.
- Content Type: Select the content type group and content type you want to use for query from the drop-down lists.
- Audience Targeting: If you want the Web Part to honor any audience targeting settings on the items, select the Apply Audience Filtering check box.
- Additional Filters: Include any additional fields on which you wish to filter by selecting from the drop-down lists. The list of available fields is determined by the list type and the content type.For example, to display all tasks that aren’t started, choose Task Status, Is Equal To, and Not Started from the drop-down lists.You can configure more query options for the Content Query Web Part with SharePoint Designer 2010.Behind the scenes, this Web Part generates a query with SharePoint’s query language, CAML (Collaborative Application Markup Language). You can write your own custom CAML query to use instead of selecting the options; you can find sites that tell you more about CAML by searching “CAML syntax” in your favorite search engine.
- In the Presentation section of the Web Part, select the options that will display your items.
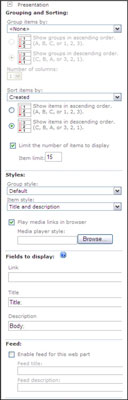
- Grouping and Sorting: Select the columns by which you wish to group results in the Group Items By drop-down list. You can also choose to group results by site by selecting the Site option in the Group Items By drop-down list.You can select a column to sort by and limit the number of items displayed by choosing the Sort Items By drop-down list and selecting the Limit the Number of Items to Display check box, respectively, and then entering a number in the Item Limit field.
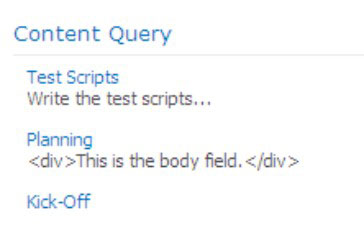
- Styles: Select the group style and item style you want to use to display your items from the Group Style and Item Style drop-down lists.These styles determine what information appears. For example, Title and Description displays the item’s title field, linked to the document or item, along with the description.These styles are XSL templates, not CSS styles. You can create your own XSL templates using SharePoint Designer 2010.
- Fields to Display: Specify the fields that you want to map to the item style you select by typing them in the Fields to Display text boxes.In the case of most documents and articles, the Comments field is the default description field. For items, you have to decide which field you want to use. For example, the Tasks content type uses the Body field. Enter the field name Body in the Description field and the value of that field appears in the Web Part.
- Feed: Indicate whether you want an RSS feed to be generated for the results of this query by selecting the Enable Feed for This Web Part check box.
- Click OK.Your query appears in the Web Part.
========================================================================
Features of DVWP
- SharePoint Designer is required for developing DVWP.
- DVWP can fetch data from data sources other than lists like xml files.
- DVWP can fetch data from other site collection.
- DVWP can merge data from more than one list.
Features of CQWP
- CQWP can fetch data based on Content Type.
- You can enable RSS feed in CQWP.
- RSS feed in CQWP is XSLT based, which gives you option to customize the RSS feed. CQWP uses the /Style Library/Xsl Style Sheets/Rss.xsl file for rendering RSS feeds.
- Edit the web part and add the “RSS Feed List” as a source.
- In the Presentation Section under Feed enable feed for the web part. In the Fields to display map the Description list column with the Description slot.

- You can map list columns with the Page properties.
- CQWP generates Field to Display which you can map with your custom columns.
- Slots are reusable templates in which you can map your Column Values without going into the code. CQWP parses the selected Item Style template and generates slots for it: every @Property becomes a slot.
- We can map custom column values into these slots. E.g. If we a custom column ‘Category’ then we can map its value to ‘Title’ slot as below. Amazing thing is, we do not have to pull our hairs to get the internal name of the column. We just need to write the Display Name of the column to be mapped. So Title will take Category value now.

- Moreover, you can map more than one column into the slot but only the first non-blank column value will be shown.


How to create Custom ‘Slots (Field to display)’?
Add your column as below to exported CQWP *.webpart file
<property name=”CommonViewFields” type=”string” >Category, Text</property>
Limitation of Content Query Web Part (CQWP)
One of the most powerful web parts since SharePoint 2007 is the Content Query Web Part but it has some strange limitations. To be more specific not the web part has the limitation it seems more that SharePoint has, from my point of view, a big architectural failure. Let me explain why.
The mission
I wanted to create a Content Query Web Part (CQWP) that displays the content types “Events” and “Article Page” that was changed in my portal. This seams on first hand to be an easy task to accomplish. A well-known mechanism for this is to overwrite certain properties of the default content query web part. This can be done by simply exporting a default configured content query web part.
Glyn Clough has a good article about how this can be done. For more information it’s recommended to check out his blog post: CQWP #2: Aggregating items with multiple content types. Another recommended resource for this is How we did it: mavention.nl – Part 5: Mavention RSS by Waldek Mastykarz.
The task that needs to be done is writing a CAML Query, which is straight forward task, and using the <QueryOverride> property in the web part configuration. The Query for this will look like this:
1 | <Where> |
2 | <Or> |
3 | <BeginsWith> |
4 | <FieldRef Name='ContentTypeId' /> |
5 | <Value Type='Text'>0x0102</Value> |
6 | </BeginsWith> |
7 | <BeginsWith> |
8 | <FieldRef Name='ContentTypeId' /> |
9 | <ValueType='Text'>0x010100C568DB52D9D0A14D9B2FDCC96666E9F2007948130EC3DB064584E219954237AF3900242457EFB8B24247815D688C526CD44D</Value> |
10 | </BeginsWith> |
11 | </Or> |
12 | </Where> |
13 | <OrderBy> |
14 | <FieldRef Name='Created' Ascending='FALSE'/> |
15 | </OrderBy> |
If you want it in a more user friendly way the Content Query could also look like this:
1 | <Where> |
2 | <Or> |
3 | <BeginsWith> |
4 | <FieldRef Name='ContentType' /> |
5 | <Value Type='Text'>Event</Value> |
6 | </BeginsWith> |
7 | <BeginsWith> |
8 | <FieldRef Name='ContentType' /> |
9 | <Value Type='Text'>Article</Value> |
10 | </BeginsWith> |
11 | </Or> |
12 | </Where> |
13 | <OrderBy> |
14 | <FieldRef Name='Created' Ascending='FALSE'/> |
15 | </OrderBy> |
The only difference between those two queries is that the first uses the ContentTypeId field, which requires the GUID of the Content Type to filter and the other use Content Type Field by using the display name of the Content Type. By filtering those fields with BeginsWith in case of Content Type ID will also include all child content types. Never the less both queries are from a syntactical point of view correct and should work.
To add this query to the web part it’s recommended to make it single lined an wrap it in a <![CDATA[<Where> …. </OrderBy>]]>. This helps a lot because otherwise all < and > brackets needs to be replaced with < and >.
All the configuration work is done so far for this first test. When the web part is placed on the page then it won’t return any result on first hand, because it needs to be configured first. In the query option of the web part indicates that the custom query is used for this web part, which is the one we entered in the web part xml.

Web part with QueryOverride Property Set
I applied the default settings and what I got was a web part with no results but how can this be? In my test I let the list type to default settings which is “Page Library”. The expected behaviour would be that SharePoint will return a least all pages in my site collection. In the ULS Log the query can be found that SharePoint will execute against the database. No exception happened on this query but also no result was returned.
Content Query with no result
Next I changed the list type to calendar and the events were returned correct, but the article pages were still missing. Both were valid queries but how can it be that the query against the page library return no result and the other query returns a result? So is this a bug or by design? I will provide my answer to that a bit later.

Content Query Result with Events returned
Digging in the documentation I found a really useful article call How to: Customize the SharePoint Content By Query Web Part by Using Custom Properties (ECM). In the List Override section there are several examples that can be used to override the list behaviour on the content query web part. I also found the following xml snippet for base list type:
1 | <![CDATA[<Lists BaseType="0"></Lists> |
2 | ]]> |
The name of this base type indicates that the real base type for all lists will be used. So I edited the web part again but now I modified the ListOverride property. I used the same procedure as before and imported the web part into SharePoint, edited the web part and used “Pages Library” as list template and I got events right away. The good news is that the ListsOverride work quite well, the setting of the web part, which is Pages Library, was overwritten. It works but won’t return the right result. I also checked the CAML query in the ULS Log and this truly uses the defined property.
The list types that can be used to override by the following values:
0 – Custom List (General List Type)
1 – Document Library
2 – Not used
3 – Obsolete. Use 0 for discussion boards.
4 – Surveys
5 – Issues List
1 – Document Library
2 – Not used
3 – Obsolete. Use 0 for discussion boards.
4 – Surveys
5 – Issues List
Those values can be also found in the documentation: http://msdn.microsoft.com/en-us/library/ms466730.aspx.
It seems to be that this mission cannot be accomplished. No matter what you try. I spend a couple of days on this; getting different content types in a single query won’t work. I also did some testing with a coded web part using the same mechanism but this won’t work also. Some tries ended in HResult exception. At the end I don’t believe this behaviour is not a bug. I think it is more an architectural issue or limitation.
It seems to be that this mission cannot be accomplished. No matter what you try. I spend a couple of days on this; getting different content types in a single query won’t work. I also did some testing with a coded web part using the same mechanism but this won’t work also. Some tries ended in HResult exception. At the end I don’t believe this behaviour is not a bug. I think it is more an architectural issue or limitation.
I want to give another example where this behaviour is annoying too. Imagine for example a project site where you want track project tasks and issues in a single content query web part. This also cannot be done because the list types for both content types are different. A SharePoint Task list use a custom / generic list type (Base Type 0) and an Issue Tracking List is based on Issues List Type (Base Type 5). Both List types cannot be queried in a single content query, because these content types use different list types.
Conclusion
Content Query Web Part is the most powerful weapon in SharePoint for aggregating content in SharePoint. You can query different Content Types but you need to make sure that the list types in your query match all content types and cannot be mixed. List Types was first introduced in SharePoint 2003 and since then there was not much architectural change. This problems / behaviours are strange anyway. It could be that Microsoft did this for performance optimization of content queries but I think a single query against the database will be much faster than to have different web parts run single queries to the database.
What I would like to see in the future of SharePoint is that the different list type will inherit from a generic list type. I think this could solve the problem with the queries and adds more flexibility to SharePoint.
Beside the problem with the content query I will also have the same base functionality on every list or document library. Currently generic lists don’t support major and minor versioning but a document library does. I find this a bit strange too.
=======================================
Create a DVWP, consuming a SP List as the data source

Here I have sorted recodes by Start Time and also grouped records by Start Time.

Customizations (HTML, CSS, XSLT) and export
Refer data source by List Name instead of List ID
If we check the “SelectParameters” section of the Web Part code, we can see Data Source is referred using ListID. Here we can change it t List Name or List URL to add more flexibility.
Then go to "
Adding Styles to the Control/Records
Find "" statement and add styles around "" part to apply styles to the whole control. It will work as a wrapper style for the Web Part surrounding all items.
If need to add a wrapper styles around each list item separately add it around following section.
Export Web Part
Select Web Part in the designer and go to "Web Part" tab, select "To File" option.
Include Web Part in a Visual Studio solution
=======================================
Data View Web Part, The Basics - Insert a DVWP on Your Page
The Data View Web Part is all about aggregating and managing data from various data sources. They are able to retrieve data from various data sources and appearance of that data can be adjusted by applying Extensible Stylesheet Language Transformations (XSLT). Here are the steps to create a simple web part.
- Create a DVWP in SharePoint Designer 2010, consuming a data source (Ex: SP list)
- Customizations (HTML, CSS, XSLT)
- Export Web Part
- Include Web Part in a Visual Studio solution
Create a DVWP, consuming a SP List as the data source
- Open SharePoint site in SPD and create an .aspx page ("All Files"->"Pages"->”New”->“ASPX”).
- Right click new .aspx page and select "Edit File in Advanced Mode"
- Before doing any changes, save the page. It will automatically add required references to the top of the page.
- Then add an Empty Data View to the page.


- Select "Click here to select a data source" option to select a data source.

- From the “Data Source Picker”, select the interested List or Document Library

- Once required fields are selected, expand "Insert Selected Fields as..." dropdown from the same pane. In here to have multiple items in the WebPart, select "Multiple Item View"

Now we are in a state of we can preview the Web Part control. Save changes and press F12 to see the page in browser.

In the above view we get all the records listed as a table. If required we can do the modifications like Grouping, Sorting, Paging, etc. For that select Web Part in the design view and go to "Options" tab. For grouping, select "Sort & Group" option.

Here I have sorted recodes by Start Time and also grouped records by Start Time.

Customizations (HTML, CSS, XSLT) and export
Refer data source by List Name instead of List ID
If we check the “SelectParameters” section of the Web Part code, we can see Data Source is referred using ListID. Here we can change it t List Name or List URL to add more flexibility.
<SelectParameters>
<WebPartPages:DataFormParameter Name="ListID" ParameterKey="ListID"
PropertyName="ParameterValues"
DefaultValue="{3168E887-8820-4970-8A55-5D576879}"/>
<asp:Parameter Name="StartRowIndex" DefaultValue="0"/>
<asp:Parameter Name="nextpagedata" DefaultValue="0"/>
<asp:Parameter Name="MaximumRows" DefaultValue="10"/>
</SelectParameters>
First change "ListID" to "ListName" and give list name in the "DefaultValue" field in the SelectParameters section.
<SelectParameters>
 <WebPartPages:DataFormParameter Name="ListName" ParameterKey="ListName"
  PropertyName="ParameterValues" DefaultValue="Announcements"/>
 <asp:Parameter Name="StartRowIndex" DefaultValue="0"/>
 <asp:Parameter Name="nextpagedata" DefaultValue="0"/>
 <asp:Parameter Name="MaximumRows" DefaultValue="10"/>
</SelectParameters>
Then go to "
<parameterbindings>" section and change "ListID" to "ListName"
and "DefaultValue" to name of the list.
<ParameterBinding Name="ListName" Location="None" DefaultValue="Announcements"/>
Adding Styles to the Control/Records
Find "
<div class="ccccc">
<xsl:call-template name="dvt_1"/>
</div>
If need to add a wrapper styles around each list item separately add it around following section.
<xsl:call-template name="dvt_1.body">
<xsl:with-param name="Rows" select="$Rows"/>
<xsl:with-param name="FirstRow" select="1" />
<xsl:with-param name="LastRow" select="$dvt_RowCount" />
</xsl:call-template>
Export Web Part
Select Web Part in the designer and go to "Web Part" tab, select "To File" option.

Include Web Part in a Visual Studio solution
- Go to SharePoint project in the Visual Studio and add a Web Part control (Ex: WebPart1).
- Delete “WebPart1.cs” file since we are not going to use it.
- Open “WebPart1.webpart” file and replace its content by the content in exported file.
- Remove "ListId", "ListName" properties in the “WebPart1.webpart”.
No comments:
Post a Comment