Friday 21 February 2014

Create Site Collections from Web Template in SharePoint 2010

I happened to work on a project where we had to create site collection based on the web templates. In SharePoint 2010, when you save a site as template, it is saved as a sandbox solution.
But as we know, sandbox solutions are site collection scoped. So we will see how we can deploy one of these at the farm level and create site collections using the web template.

First we will create a site based on the Team site template, make some changes and save it as template.


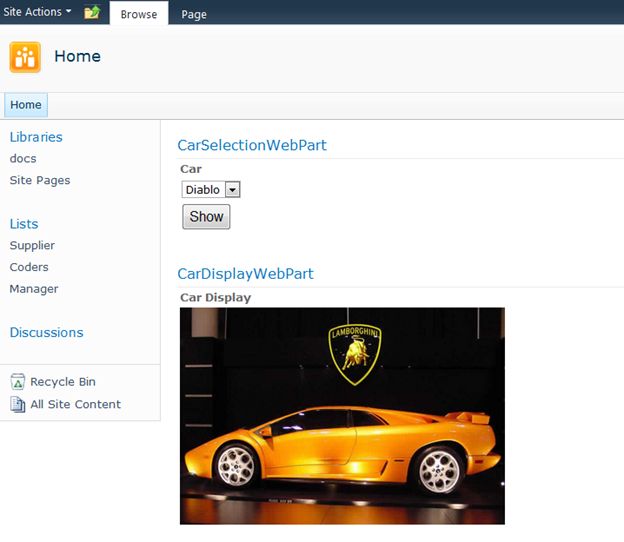
I have customized the home page a little to make it look different from the default team site template.
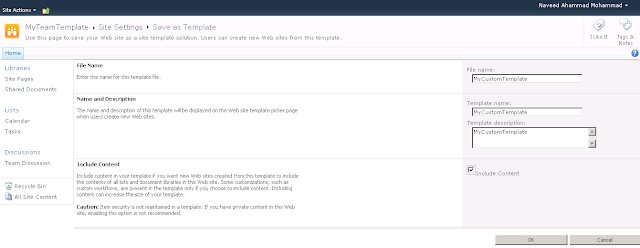
Now go to Site Settings and click on Save site as template


This will save the template to the solution gallery of the site collection
Click on the solution gallery link in the success dialog.
Use the open with explorer feature and copy the wsp.


Open the solution using Visual Studio 2010 now. Create a new SharePoint project of type Import SharePoint Solution and select Deploy as a Farm Solution.


Select the copied wsp from the Browse dialog


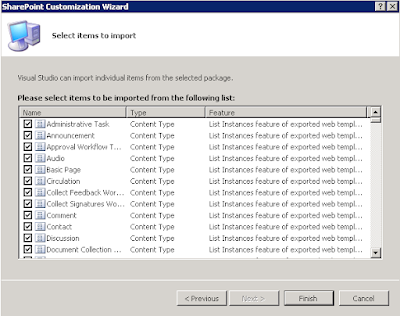
In the next dialog that appears you will be able to select the components to import from the wsp. Leave everything select and click on Finish


Visual Studio will give the success message for the import


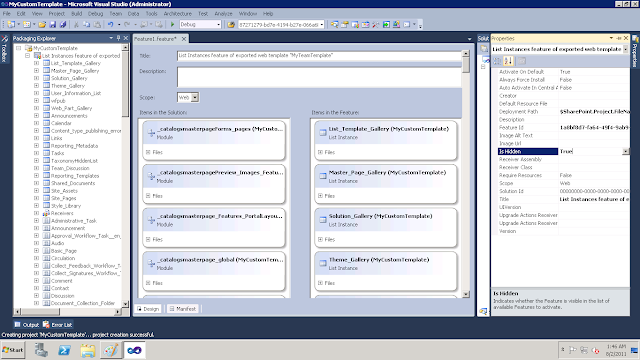
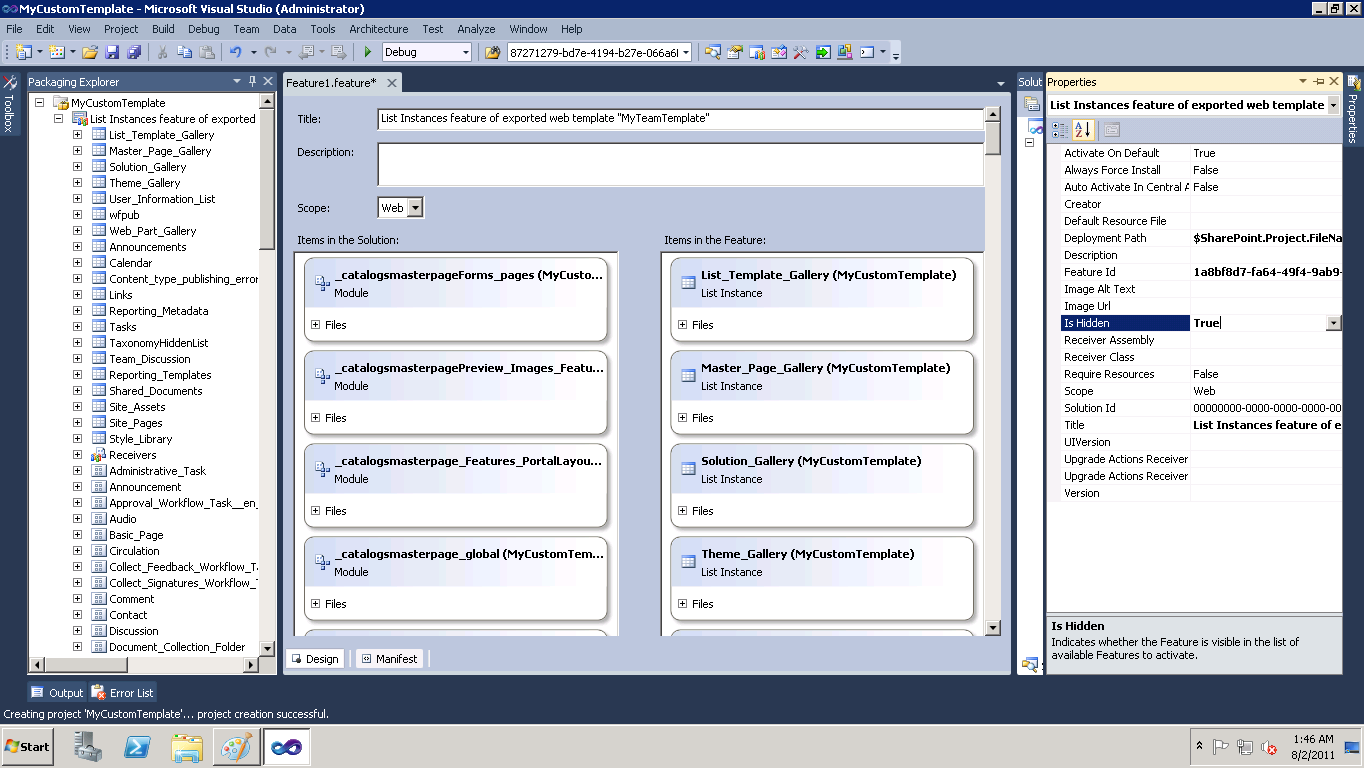
Now you will see a lot modules and four features in the solution explorer. One of these features contains the files related to the web template.
Double click on each feature to open the properties for that feature. 
Generally Feature3.feature contains the files related to the web  tempalte.
Open this feature and change the scope of the feature to Farm.


Then expand the Files in the web template that you see in the above screen. and click on the Elements.xml file.


This will open the Elements.xml file for the web template. Add another parameter to the list of parameters called DisplayCategory. This is the category under which your template will be visible in the site collection creation page.


Change the Subweb parameter to TRUE so that subsites can be created using this template.
Then, double click on the other features to see the properties. Set the IsHidden property to TRUE for all the other features.


Deploy the solution and try creating a new site collection.
This time you will see a new category and a new template along with the default.


Create a new site using the custom template you created. 


It is as simple as that. SharePoint 2010 and Visual Studio 2010 have made life easier for the developers haven't they !!!.

SharePoint list forms display HTML instead of rendering

I have recently come across a problem where a custom list form i created using SharePoint designer was displaying the HTML directly instead of rendering it.


As shown above the HTML for the Assigned To column value is not being rendered.
To overcome this you just have to add a simple property to you XSLT.

Select the HTML that is displayed and go to the code view.
You will see the statement as
<xsl:value-of select="@Assigned TO"></xsl:value-of>

To this you have to add a parameter called display-output-escaping
<xsl:value-of select="@Assigned TO" display-output-escaping="yes"></xsl:value-of>


As you can see, this time the HTML is rendered properly.

Use XSLT to hide columns in SharePoint list forms

In this post i will explain how XSLT can be used to hide the list columns in forms for users with insufficient previleges.

After you open your site and the list in SharePoint designer, create custom forms for New, Edit and Display forms.

Open each of the forms and select the column which should be shown based on user permissions.


Expand the Conditional Formatting option on the ribbon and select Show Content.
In the next screen click on Advanced.
In the pop up that appears after that, search for the function called IfHasRights
This function will determine whether the current user has the rights specified and will do the formatting accordingly, based on the result.


The permission mask specified is determined as the sum of the permission masks for the permissions required. Below mentioned are the permission masks for the permissions.

ViewListItems - 1
AddListItems - 2
EditListItems - 4
DeleteListItems - 8
ApproveItems - 16 
OpenItems - 32 
ViewVersions - 64 
DeleteVersions - 128 
CancelCheckout - 256 
PersonalViews - 512 
ManageLists - 2048 
ViewFormPages - 4096 
Open - 65536 
ViewPages - 131072 
AddAndCustomizePages - 262144 
ApplyThemeAndBorder - 524288 
ApplyStyleSheets - 1048576 
ViewUsageData - 2097152 
CreateSSCSite - 4194314 
ManageSubwebs - 8388608 
CreateGroups - 16777216 
ManagePermissions - 33554432 
BrowseDirectories - 67108864 
BrowseUserInfo - 134217728 
AddDelPrivateWebParts - 268435456 
UpdatePersonalWebParts - 536870912
ManageWeb - 1073741824 
UseRemoteAPIs - 137438953472 
ManageAlerts - 274877906944 
CreateAlerts - 549755813888 
EditMyUserInfo - 1099511627776 
EnumeratePermissions - 4611686018427387904 

Give appropriate mask as shown in the screenshot above and save the form.
The next time the users open the form, they will see the column only if they have enough permissions.
Ofcourse you have to do the same to the label(Deparment) beside the text box you selected previously 


This is how the form will appear for users who do not have enough previleges.

Connected Web Parts in SharePoint 2010

In this article we can explore Connected Web Parts which is an advanced SharePoint Web Part feature. The connected web parts denote communication between 2 web parts.

CntWbShare1.jpg

The connected web part resolves the following requirements:
  • Master Web Part and Slave web part data exchange
  • Data Selection and Data Display web part communication
Summary of the application is:
  • There are 2 web parts
  • Web Part 1 has a drop down list for selecting Car
  • Web Part 2 displays the car picture based on selection
Steps Involved

Following are the steps involved in creating connected web parts:
  1. Create Project
  2. Create Communication Interface
  3. Create Web Part 1 (Provider) implementing Interface
  4. Create Web Part 2 (Consumer)
  5. Build and Deploy
Create Project

We can experiment with a Car showcase application where there are 2 web parts.
  • The first web part allows selecting a Car from the drop down list.
  • The second web part displays the image of the car.
to begin, create a new Web Part project in Visual Studio.

CntWbShare2.jpg

Remove the default VisualWebPart1 web part. We will be adding our own web parts.

Create Interface

For communication between the 2 web parts we need to create an interface. Please create the following interface, which returns the selected Car name:
public interface ICar{
    string Car { get; }
}


Create Provider Web Part implementing Interface

Now you can create a new web part named CarSelectionWebPart. Expand the webpart item and in the User Control (CarSelectionWebPartUserControl.ascx) class file:
  1. Add a drop down list control
  2. Place the following code
public partial class CarSelectionWebPartUserControl : UserControl{
    protected void Page_Load(object sender, EventArgs e)
    {
        if (!this.IsPostBack)
        {
            DropDownList1.Items.Clear();
            DropDownList1.Items.Add("Camry");
            DropDownList1.Items.Add("Figo");
            DropDownList1.Items.Add("Diablo");
        }
    }
    // Property to expose selected car outside    public string Car
    {
        get;
        set;
    }
    // Set the Car property    protected void Button1_Click(object sender, EventArgs e)
    {
        if (DropDownList1.SelectedItem != null)
            Car = DropDownList1.SelectedItem.Text;
    }
}


In the CarSelectionWebPart.cs (web part class file) add the following code:
 
// Property to return the selected Car
public string Car
{
    get
    {
        return (_control as CarSelectionWebPartUserControl).Car;
    }
}

// Special Purpose Attribute to denote ICar interface is provided
[ConnectionProvider("Car")]
public ICar GetCar()
{
    return this;
}
The ConnectionProvider attribute and the interface of the method denotes that this web part provides data for ICar interface. The Connection Provider also says that the name is Car (in string).

Create Consumer Web Part

Now we can create the consumer web part which will get the selected Car to display the car picture. Add a new web part and name it CarDisplayWebPart. Place an image control on the user control of the web part. In the class view of the user control add the following method:
 
// Set the image to url
public void SetImage(string car)
{
    if (car == "Camry")
        Image1.ImageUrl = "/_layouts/images/ConnectedWebParts/Camry.png";

    else if (car == "Figo")
        Image1.ImageUrl = "/_layouts/images/ConnectedWebParts/Figo.png";
           
    else if (car == "Diablo")
        Image1.ImageUrl = "/_layouts/images/ConnectedWebParts/Diablo.png";
}

Now add Images Mapped Folder and place 3 image files (Camry.png, Figo.png, Diablo.png) in the folder as shown below:

CntWbShare3.jpg

Build and Deploy

Now build the project and use the Deploy command. Open the SharePoint site in edit mode and add the above 2 web parts into it. You are now ready with the following 2 web parts.

CntWbShare4.jpg

Set Connection

Use the context menu of CarDisplayWebPart to set the connection to provider web part.

CntWbShare5.jpg

Testing the Web Parts

Now stop editing the web page and refresh the site. Select a car from the first web part and the car picture is displayed on the second web part.

CntWbShare6.jpg

This concludes our article on Connected Web Parts creation.

Debugging the Web Parts

You can debug the application, by executing the project in Debug mode. Any break points set will be executed.

CntWbShare7.jpg

References
http://msdn.microsoft.com/en-us/library/ms469765.aspx 
http://rtmgroupq8.com/en/add-image-to-sharepoint-visual-web-part 

Summary

In this article we have explored the Connected Web Parts feature of SharePoint Web Parts. In real-world scenarios there could be multiple web parts communicating with each other through connected web parts. SharePoint also supports AJAX enabled web parts which provide a better communication between web parts. 

Thursday 20 February 2014

SharePoint 2013 videos

Videos:

In this section you will get videos for SharePoint developer, administrator and end user in SharePoint 2013.
Let us know your feedback in the comments section at end of the page on what topics you want videos, we will create and share with you.
Happy learning!

Developer:

Administrator/Power User:

End User:

Webparts:

Refereces:
http://www.sharepoint-journey.com/script-editor-webpart-in-sharepoint-2013.html

jQuery


jQuery is the one of the important scripting language to make your web pages more interactive by changing them on the fly.
Its very essential to understand the basics right, so it will help you a lot  in SharePoint development.
While developing apps this is one of the major tool to develop SharePoint  Apps on SharePoint 2013. You can develop apps anywhere i.e. On either on-premises or the SharePoint online. 
In this post we will cover the basics of jQuery and what are the tools required to write the scripts and how this has been used in SharePoint hosted apps.
You will learn with the help of examples that we use in SharePoint development in this case SharePoint Apps development, so that it will easy when you come across those scripts that we use while developing an application. This approach makes learning of the concepts makes simple.
Any suggestions on this approach you can post in the comments section below.
Another main advantage of the this scripting language is to allow for easy selection of Document Object Model (DOM) elements and to perform operations on the collection of selected elements in  the HTML page. It's popular because it simplifies the process of selecting DOM elements.

Note: It is not only for SharePoint developers, if you are dot net developer it provides lots of opportunities to create more interactive web pages in web development. For that matter any web developer and designer.

What is DOM?

It is a standard defined by the World Wide Web Consortium (W3C) for web developers and designers to interact with web pages on any browser.
According to Wikipedia, it defined DOM as below.
"The Document Object Model (DOM) is a cross-platform and language-independent convention for representing and interacting with objects in HTML, XHTML and XML documents".
Development of apps in SharePoint has to be on client side so as a SharePoint developer it becomes very important and added advantage if you learn it.

What are the tools or software required to learn:

Below are the basic tools required to start learning it:
  1. Text editor (note pad or notepad++) : To write the script.
  2. Browser (internet explorer, Mozilla, Google Chrome etc.) : To test  what you have written.
  3. jQuery library : which will reduce the code to be written to achieve the required functionality.
  4. Web Server : If you are going for web development this is required. It can be on your local machine also.
If you have a machine, by default you will have a note pad (Text editor) and browser. The web server can be an IIS (Internet Information server).
From where do we get library?
You can go to www.jQuery.com , click on download and get the latest version either production or development.

Difference between Production and developer version:

  • Production version improves the performance by deleting the unwanted spaces.
  • Developer version is to explore more of what is inside the library.
Note: To Learn jQuery, you need to know HTML and CSS. But whenever it is required i will cover them.

What is all about  $ symbol ?

You will see the dollar $ symbol everywhere whenever you try to write scripts. $ Symbol is equivalent of jQuery, so instead writing each and every time jQuery in the script we can simply use $ symbol.
// $ symbol is equivalent of jQuery
jQuery () = $()
While writing the functions you can simply specify $ ().
What can be different parameters you can pass into the function.
  • CSS selector.
  • String of HTML.
  • Or Javascript object.

JavaScript interpreter:

JavaScript interpreter applies changes to the DOM's representation of the page in the browser history. You will come to know to know how this behaves while working on scripts. Whenever the JavaScript interpreter see the code between the <script></script> tags, it will translate the directions you given in to the actions on the page

Selectors:

We have three types of selector.
In the examples we will use CSS selectors.

1. Elements Selector:

// Shows the all the P elemnts in the page
Example : $("p").show();
// P is a paragraph element in CSS
// CSS element selector:
P {
Text - color:#000000;
}

2. Class selectors:

// Slide up all the elements that are memebrs of CSS class class
Example : $(".class").Slideup();
.class is a class element in CSS
CSS Class selector:
.class{
display:block;
}

3. Id Selector :

// Adds text "hello" to the ID selector
Example : $("#message").text("Hello");
#message is a ID element in CSS
CSS ID selector:
#message{
color:#FF0000;
}

Examples:

You will learn the concepts using the code snippets that we come across in SharePoint Apps development.
Below is the code snippet you will get it under App.js file when you create SharePoint-Hosted app using visual studio 2012.
In the above code snippet we will look into 
$(document). ready ( function (){
});
In the above code selector is document which means DOM and Ready is a method.
Always remember the separator between the selector and method is dot.
JavaScript interpreter says to DOM, whenever you are Ready and loaded I want you to do some activity inside the function()).
DOM says to the JavaScript interpreter that whenever I am Ready I will execute the code inside the curly braces.
So whenever the DOM is loaded completely it will execute the below lines of code.
context = SP.ClientContext.get_current();
web = context.get_web();
getUserName();
Next one is   
$('#message').text('Hello ' + user.get_title());
In  the above code  we are adding text "Hello" to a #message selector.

Conclusion:

In this article we have seen what is jQuery and its advantages. What is a $ dollar symbol, JavaScript interpreter, Selectors. Seen one example App.js file in SharePoint hosted app project.
Hope this will start you to learn the concepts of beautiful scripting language.
- See more at: http://www.sharepoint-journey.com/jquery.html#sthash.f8Rl0goj.dpuf